Sunday, April 14, 2013

Grilled Caesar Salad


First off, yes you can grill a salad.

Those greens usually let things like meat, veggies, or other flavorful toppings take the lead, but in this production these mean greens are the star of the show. Give this one a try and wow your guests with a creative twist on a classic. And to my fellow MinneSNOWtans: if it's not going to feel like spring, we can at least make it taste like it right?

Ingredients
Romaine hearts (at least one per person)
Olive oil
Salt and pepper
Garlic salt
French bread
Parmesan cheese (fresh of course)
Lemons or lemon juice
Your favorite caesar dressing (mine is Cardini's)
Grilled chicken (optional)

Directions
Heat grill to medium-high heat. Brush romaine hearts with olive oil, generously. Season with salt and pepper, generously (I'm feeling very generous today). Place hearts on the grill and rotate until you achieve those beautiful grill marks on all sides (about 30-60 seconds on each side if your grill is hot). Remove from grill and set aside.


And now to my favorite part, homemade croutons. Heat a skillet to medium-high heat. Cube french bread, toss in olive oil, salt, pepper, and garlic salt to your liking. Saute until you achieve a nice toast on all sides. Eat one to make sure they're done. Eat another because they're so darn good. Repeat as necessary.


You have two options here. You can slice each heart down the middle and serve that way, or chop the lettuce before serving to better coat with dressing and to make things easier on your guests. Once chopped, toss in a large bowl with a little (you don't need much as the grilled greens pack plenty of flavor) Cardini's caesar dressing and fresh lemon juice. Top with fresh grated parmesan and croutons. Enjoy!


A shout out to my foodie friend Sarah Hirst for introducing me to grilled caesar salad!

Tuesday, November 6, 2012

Honey Lavender Ice Cream


My favorite season is quickly coming to an end and my potted herbs are going with it. This growing season featured basil, rosemary, mint, chives and lavender. Most of these herbs can be used to spruce up nearly every meal of a weekly menu, but what about that darn lavender? Sure it smells and looks nice sitting in your bedroom, but how can you USE it?

Don't ask questions. Just make this. It's fresh, light, and (almost) guilt-free. I usually feel a bit heavy after indulging in a few scoops of ice cream, but for some reason this one's different. Awesomely different. In the words of my snobby, foodie hubby, "it gets better and better with each bite."

Makes about one quart

Ingredients
1 cup half and half
1 cup milk (I used skim)
1/3 cup honey
5 egg yolks
1/4 cup white sugar
1 cup heavy cream
1/4 cup dried lavender

Directions
In a saucepan, combine milk, half and half, lavender and honey. Bring to a gentle boil, cover, and remove from heat. Let sit sit for five minutes. Strain mixture, reserving milk and discarding lavender.

Combine egg yolks and sugar in the bowl of your electric mixer. Beat on medium-high speed until thick and pale yellow (about 5 minutes). Return milk mixture to saucepan and bring to a simmer.

Add half of the milk mixture to the egg mixture and whisk until blended. Stir mixture into remaining milk and cook over low heat, stirring constantly, until thick enough to coat the back of a wooden spoon.

Remove from heat and immediately stir in chilled cream. Strain mixture (get rid of the semi-cooked egg) into a medium mixing bowl. Refrigerate until chilled (about 30-60 minutes). Freeze in an ice-cream maker according to instructions. For me, it's strictly KitchenAid attachments.

Once frozen solid (patience is key here), serve and enjoy. Store in an airtight container for up to two weeks. Trust me, it won't last that long.

Adapted from Martha Stewart's Honey Lavender Ice Cream recipe.

Monday, February 13, 2012

Red Velvet Cupcakes with Blackberry Cream Cheese Frosting


If you aren't able to spend this Valentine's day with someone sweet, be sure to spend it with SOMETHING sweet. The base of this cupcake came straight from a box and I'm not ashamed to admit it. Sometimes you just don't need to fix what's not broken and in my opinion, Betty Crocker does it best when it comes to red velvet.

 
As I was making my favorite cream cheese frosting, I decided to throw in a little something extra that happened to be staring at me in the fridge. It turned out wonderfully and according to my hubby, tasted like ice cream (I took it as a compliment because he LOVES ice cream). Give this simple beyond simple number a try this Hallmark holiday and let me know what you think. Enjoy!

Makes about 24 cupcakes

Cupcake Ingredients
1 box Duncan Hines Red Velvet cake mix
3 eggs
1 1/4 cup water
1/3 cup cooking oil

Frosting Ingredients
3 tablespoons butter, softened
1 (8 oz) box cream cheese, softened
1 teaspoon vanilla
5 cups powdered sugar

Directions
Heat oven to 350. Place paper liners in each of 24 regular-size muffin cupcakes. Mix cupcake ingredients in large bowl. Divide batter evenly among muffin cups, filling each about two-thirds full. Bake for 19-22 minutes. Let cool for about 30 minutes.

Whip together butter, cream cheese and vanilla. Add powdered sugar 1/2 cup at a time until you achieve your desired consistency. Mix in a handful of crushed fresh blackberries. Frost cupcakes.


I recommend serving these, as well as any cream cheese dessert, chilled.

Saturday, February 4, 2012

Key Lime Cupcakes


There's nothing like a bite of sweet sunshine to get you through that last stretch of winter. I made these cute little treats for a bachelorette party last weekend and they were a hit! Oh, and did I mention how SIMPLE these are to make? Trust me, you can't screw this one up.

Taylor, my friend, and her hubby-to-be are currently en route to Key West, Florida tie the knot (guess who's jealous). I dedicate this post to Taylor and Brett and wish them nothing but happiness and sunshine on their wedding day and beyond!

Makes about 24 cupcakes

Cupcake Ingredients
1 box lemon cake mix
1 box lime-flavored gelatin
3/4 cup water
1/3 cup key lime juice (trust me, it's at your local grocery in the juice aisle)
1/3 cup canola oil
3 eggs

Glaze Ingredients
1 cup powdered sugar
2 tablespoons key lime juice

Cream Cheese Frosting Ingredients
1 package (8 ounce) cream cheese, softened
1/4 cup butter, softened
1 teaspoon vanilla
3 1/2 cups powdered sugar
Crushed graham crackers for garnish (optional)
Sliced lime wedges for garnish (optional)

Directions
Heat oven to 350. Place paper liners in each of 24 regular-size muffin cups. Mix cupcake ingredients in a large bowl (I always use my handy dandy KitchenAid stand mixer, coincidentally key lime green). Divide batter evenly among muffin cups, filling each about two-thirds full.


Bake cupcakes for 19-24 or until toothpick inserted in center comes out clean. Let cupcakes cool in pan for ten minutes. With toothpick or wooden skewer, pierce tops of cupcakes in several places.

In a small bowl, mix together glaze ingredients then drizzle over pierced cupcakes. Let cool completely, about 30 minutes.


In a stand mixer, beat together cream cheese and butter until light and fluffy. On low speed, beat in vanilla and powdered sugar until thick enough to frost. Frost cupcakes.


Top with crushed graham cracker and a fresh lime wedge. I recommend serving any cream cheese dessert chilled.


This recipe was adapted from Betty Crocker's Key Lime Cupcakes.

Saturday, January 14, 2012

Baked Steel Cut Oats


Do you agree that homemade baked macaroni and cheese is head and shoulders above that stuff on the stove, and that the stuff on the stove is head and shoulders above that stuff in the microwave? Well, this is the exact same situation. Oats in the microwave are good, oats on the stove are better and oats in the oven are THE BEST.

I have been wanting to try baked oatmeal for a while now and figured there's no better time than now--a lazy Saturday morning. I combined a few different recipes I saw on other blogs and came up with this concoction. While "winging it" when baking can be quite risky, it turned out wonderfully this time. Oh, and did I mention this is healthy? Enjoy!
Makes two hefty servings (I like a big breakfast)

Ingredients
1 cup steel cut oats (straight from the pantry, no soaking necessary)
1 cup milk
1 egg
1 teaspoon pure vanilla extract
1 teaspoon baking powder
1 teaspoon cinnamon
1 tablespoon brown sugar
3/4 cup fresh or dried fruit (I used fresh blueberries)
Dash of sea salt

Directions
Preheat oven to 350F.

Spray two ramekins with Pam.

Mix all ingredients in a bowl.

Pour mixture into ramekins and top with a sprinkle of brown sugar. Bake for 30-35 minutes.

Serve immediately with milk and sweetener of your choice. I used brown sugar today, but plan to try maple syrup and honey in the future.


I guess you could say we enjoyed this one.

Monday, January 9, 2012

Avocado Pasta


Okay, okay. This little baking blog has somehow turned into a foodie free-for-all, but I like it. This girl enjoys a little savory before her sweet so has decided to share it all. Happy 2012!

The season for binging is officially in the past and the new year is here to stay. Tis now the season for light eats and treats THAT ACTUALLY TASTE GOOD. It is a huge misconception that healthy food can't taste good. I present you with proof and introduce to you a unique dish that is so simple it will knock your socks off. Enjoy!

Serves Two

Ingredients
Pasta of your choice (I used a short pasta as it's easier to mix with the sauce)
1 ripe avocado
2 T light mayo (I used olive oil mayo)
1 handful chopped cilantro
1 clove garlic
1 lemon
1 jalapeno (optional)
Salt and pepper

Directions
Throw your two servings of pasta in boiling water.

Throw the meat of the avocado, mayo, cilantro, garlic and the juice of one lemon into a blender or food processor and pulse until you achieve a smooth, creamy consistency. Salt and paper to taste.

Once cooked al dente, strain and rinse your pasta in cold water for a few seconds. Mix the pasta with your desired amount of sauce (I used it all). Plate the pasta then top with the zest of your juiced lemon and a bit of pepper. If you like a bit of spice, invite a sprinkle of chopped jalapeno to the party. Serve immediately.


A shout out to my foodie friend Sarah Hirst for introducing this recipe to me!

Monday, November 7, 2011

Norweigan Lefse


This post was recently featured on NPR's Chompsgiving and Chew Year's: Holiday Dishes segment.

As a born and raised Iowan, I didn't think a move to North Dakota would warrant much culture shock. I figured the winters were a little colder and the trees were more sparse, but the Midwest is the Midwest. Boy was I wrong. It wasn't long ago that the terms uff da, lutefisk and lefse sounded more like a sneeze than words with such history. I will never forget the day my North Dakotan-with-Norweigan-roots boyfriend, now husband, let out his first "uff da" in my presence.

My in-laws not only drop "uff bombs" left and right, but take part in a few Norweigan traditions, particularly around the holidays. Each year, my mother-in-law gets together with fellow family members to prepare, from scratch, over 100 "sheets" of lefse. For those that are unfamiliar, lefse is a traditional soft, Norweigan flatbread made primarily from potatoes, butter, cream and flour. Having helped with the process two years in a row now, I decided to share the process in hopes that lefse will someday attract a little more "yum" and a little less "bless you."

Ingredients
9 cups of potatoes (half red, half russet)
1 1/4 cup salted butter
1/2 cup cream
4 teaspoons salt
1/4 cup white sugar
3/4 teaspoon baking powder
4 1/2 cups all-purpose flour, plus extra for rolling

Materials
Lefse grill
Lefse sticks
Rolling pin and sock
Pastry cloth-covered board
Wax paper
Large towels

Directions (Day One)
Peel, chop and boil potatoes. Once soft, drain water and set aside.


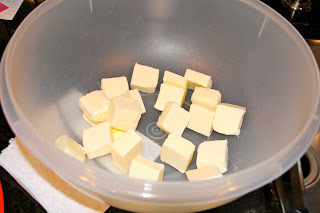
Cube the butter and place in bottom of a large heat-proof bowl.

Pour cooked potatoes over the butter and beat with a hand mixer, just as you would for mashed potatoes. Mix in cream, salt, sugar and baking powder.

Let cool then refrigerate overnight. To avoid extra moisture in the potato mixture, place a paper towel over the potatoes to absorb any condensation.

Directions (Day Two)
Roll up your sleeves, take off your jewelry and prepare for a floury mess. Add the flour, one cup at a time, to the chilled potato mixture and mix thoroughly to create your lefse dough. Don't even bother getting a spoon dirty because you'll end up using your hands in the end.


Once completely incorporated, form walnut-sized balls of dough and refrigerate while you set up your workspace.


Preheat your grill to 500F. Do not grease the grill as it must be dry. On the counter or a nearby table, fold a towel in half and place a few sheets of wax paper inside the fold. You will stack the cooked lefse on the wax paper and cover with the towel as you go. 

Rub your pastry cloth with a generous amount of flour. Do the same with your sock-covered rolling pin. You will need to re-apply flour as needed throughout the rolling process.

Now you are ready to roll, literally. Dust a ball with flour and flatten it out. Place the flattened ball on the  cloth-covered board and with your floured, sock-covered rolling pin, roll the dough into a thin, large circle.

Do not be shy with your flour. If your dough starts to stick, you're being shy. Using a lefse stick, transfer the large round to the hot grill.


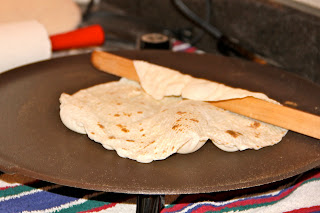
If your grill is hot enough, the lefse will begin to bubble immediately. Lightly spank those bubbles with your lefse stick. Yes, I just said spank. There's no better way to describe it.

Slide your stick under the round, lift and roll to complete your flip.

Each side only cooks for a few seconds. You are looking for light brown spots. If the  round's edges are brown or curling, you are cooking it too long. Stack the cooked lefse in alternating directions in between wax paper, covered with a towel.


Once you have about 20 sheets of lefse, wrap completely with a towel and set aside to keep from getting dry. Set up a new stacking station just as you did with the original.

Once all of your dough has been rolled and everything is covered in flour, yourself included, it's time to clean up and have a glass of wine. Actually, you should really have a full glass of wine as well as your favorite holiday Pandora station playing throughout the entire lefse-making process.

Once lefse is completely cooled, it's time to package it for future consumption. You will likely have a sheet or two right now, but should package the rest to share with family and friends throughout the long holiday season.

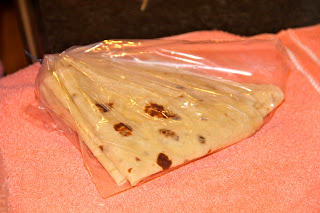
Unfold each sheet lefse and fold in the opposite direction. This will avoid the sheet from sticking to itself. Fold in half again and stack by the dozen. Put each stack in a baggie, then in a ziploc bag. As the lefse is very thin, it can easily become dry if not stored properly.
While you can eat it however you'd like, I prefer a light spread of margarine and a sprinkle of white sugar, all rolled up into a little piece of heaven.

Lefse keeps for about a week on the counter or up to two years in the freezer. Enjoy!

Oh, and if you still think lutefisk still sounds like a sneeze, good. Google it and you'll understand why.